Monday, July 16, 2012

Saint Guinefort

I decided I wanted to try something a little new and slightly different for my next piece.  A lot of the work I've been doing lately has been experimental, trying to see what I can do and how I can do it.
For this piece I wanted to work more with the strongline and also try some more advanced decorative leading. 
I had recently bought some 6" wide copper foil for another product and wanted to test it out.
 
For the Saint Guinefort piece I wanted to add a decorative halo and collar, to add a touch of medieval aesthetics.  I wrapped the sticky backed foil on the glass and just cut out the parts I wanted exposed with an exacto knife.  If worked really well and the glue was really strong which let my get some very fine details.

Unfortunately I think the collar is too dark, it's bothered me ever since I finished the piece and I may swap it out for some yellow glass.
Unfortunately it was pretty overcast for these shots so the detail isn't coming out too great.

I'm not 100% please with this, which is a shame.  I fear the snake might break off so I may have to just create a window out of it.  And that collar needs to be changed out.
Here's a close up detail of the snakes head, the strongline made a handy tounge!

Maybe after cleaning and patina I'll be happier with the results. 

Tuesday, July 10, 2012

The Wine Window II

The saga continues.  As I worked on my window two weeks ago my ancient soldering iron (with the cloth cord and wooden handle) shorted out the workroom in the basement.  And was smoking from the socket.  And the handle fell off. And it buzzed. A lot.  I figured rather than continue to use it I'd treat myself to a shiny new one.
(The beginning of the repair process, right before lights out. Notice the strip of braided steel between the foil.)


I should have done so a long time ago.  I thought the old one I found in the basement was good mostly because it was large.  Come to find it wasn't actually that powerful.  I did in two hours what it probably would have taken me an entire day to do before. Live and learn, I guess

To solve the problem of framing the piece, I decided to instead run steel wire along the outermost lead lines along both sides, tacking them at the intersections.  This way the edges were exposed.  A look that I actually really like.
 
I supported the steel wire with some heavy duty chain.  I'm not sure how much the window weighs, but I'm sure 98lbs is more than enough.

The steel even took patina beautifully.

The completed piece, still successfully hanging in the window.

Detail of the wire and glass.

And my next project: Saint Guinefort


Monday, June 25, 2012

The Wine Window

Saturday morning I woke up and it was rainy and miserable. Also, my lead hadn't come.  I ate breakfast and went back to bed.  When I woke up it was sunny and there was a five pound box of solder on my mailbox! Magic!

The completed piece!  I really need to work on my photography skills, and get myself an updated version of photoshop.  That pink is hideous and I did the best that I could with gimp but it's just not the same...


On to the next project: a masochistic attempt to repair/strengthen/frame what I consider to have been the magnum opus of my college glass practice: The Wine Bottle Window

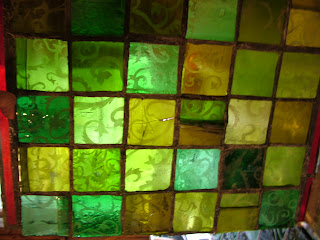
The window...has seen better days.  The construction itself was a labor of insanity love involving several bottles of wine. Hahaha. I took several (and I mean several) empty bottles and, using a glass saw, cut off the bottoms and necks.  Some of the bottles i then split in half, others I left as is.  These bottles were then sent through the glass kiln to flatten.  I cut what felt like a billion 3"x3" squares which I then painstakingly sandblasted with the leafy pattern you see.


As you can see, I got some amazing pieces of glass.  Lots of bottles bubbled, many had interesting residue left from labels, and some even fused together.  That center square is one such example.

You can see some more of the variations here.  Also, the original red border was added on the insistence of my teacher, but I never really cared for it.

Eventually, time, gravity, and an insufficient soldering job had the piece folded and broke in half.  So now I want to fix it.

Step one of the repair process: removing old lead.  This process takes some time and requires snacks, drinks, music and/or netflix.  Because you will be holding that soldering iron to that nasty old lead for a long, long, loooooong time.  Try not to burn your bare legs.  Or wear pants.

Some more of the window.  After the solder, lead and glass bits were removed then you have the problem of the glue from the copper foil.  You'll be scrapping. A lot.  WD-40 helps to take some off.

The window in its current state.  I removed the solder and foil along the break line, and the red glass from the edges.  I scrapped the glue off and even removed a badly cracked piece.  With this window there are more than a few cracked pieces, however most of them I'm leaving because the cracking happened during soldering, not from a drop.  The wine bottle glass is very, very fickle and the heat from the soldering iron tended to make it crack.  I liked the variation so left it for the most part. 


From this point on I need to clean the edges and re-foil.  I will also place some strongline along the broken joint.  If this is not enough to keep it stiff I will have to buy some iron bars and tack those on.  I will also tough up the solder where it is thin (I was a bit stingy with the solder back then!)  Finally, it needs a frame of some sort.  This window was a lot of time and effort so it deserves the proper care!

Thursday, June 21, 2012

Squalus Window

While I wait for my 5 pounds of solder to magically arrive from ebay, I thought I'd put a post up of the window desigining process.

This is for the squalus window, which will be a companion piece to my lupa window:
To start with, I printed out an image of the first window in balck and white on 8.5X11 printer paper, for size comparison and to keep the format very similar.

With a new piece of paper layered over this print out, I sketched out the full design of the window.  Generally I try to keep leading in mind but for the most part I will keep this sketchy and focus on the construction afterwards.
After making a copy of the sketch I go over the desired lead lines with permanent marker and white out the finer detail that will be decorative lead.
The combined image, the structural lead lines will be black, the decorative details are the thinner grey lines.

Now all I need to do is enlarge the cartoon and start cutting glass! The lupa window is currently in a show but luckily I have the original cartoon still kicking around in my basement. 

Wednesday, June 20, 2012

The Southern God

It's getting up past 90 degrees out there today, and I love the heat!  It reminds me of the south, which I love and where I fully intend to live one day.

Last year in May my family went to Tennessee, a beautiful place that stuck with me.  This new window is inspired by my southern love! It's a copperhead snake with cicada wings embedded in an old metal screen I found in the basement.  There's all sorts of inspiring stuff down there!

Here's a pic of the soldering process: because there are so many tiny pieces I used some junky sewing pins to hold it all together during the initial soldering process.

After soldering, up against the window.

This is where I started to get into unknown territory.  Putting the glass piece within a metal screen.  First, I cut the shape out.

Then attempted to solder...this used up the rest of my roll.  The tricky part was folding the copper foil over the edges of the cut screen.  Well, that and the soldering itself...
The window frame is about 26 inches long and maybe 8 inches wide- I'm just guessing here though.

What I've done so far, in the light.  I ran out of solder on the second side.  I've gone through two pounds in two weeks...I ordered 5 lbs of 50/50 tin/lead solder off of ebay-should arrive by the end of the week.  Hopefully that will last me a little while longer.  This is all very experimental - hopefully once it's all put together it will stay together!

Wednesday, June 13, 2012

Returning to Glass

I figured I'd start this off with a big one.  My latest glass piece: Salome.  I just finished it over the weekend.
I've recently set up the basement to have a nice little space for stained glass work, and have really started to get into the swing of things! 

I haven't done stained glass since graduating (no space in little apartments!) so it's a learning and re-learning adventure for me! 

The new things with this piece were A: soldering different types of metal and B: strongline! what did I do without strongline in my life?  Oh yeah, made some stuff that fell apart:

Yeah, this one's on the list for repairs.  Repairing windows is ten times more difficult then doing it right the first time.  But then we'd never learn!

Here are some of the process photos...


Back in the fall, I got really enthusiastic to start glass again, and had complete this piece:

Currently in the Cambridge Art Associations 11th National Prize Show
This was a very primitive process:  I had no grinder and thus used my dremel with grinding bits to help shape the glass (a very long and labor intensive process!) Also, I could only get plumbers solder in my area...the mixture of lead to tin made for a much more difficult lead line.  However the end result was successful! 
Unfortunately winter came, and there went my light.

Now that the sun is out again, I'm back at it...more to come!